Machine Operation Guide
Category
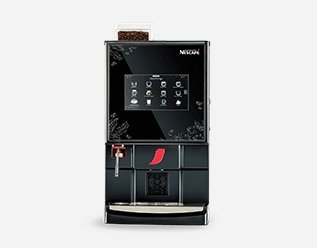
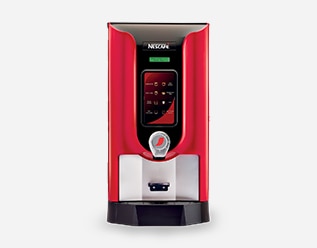
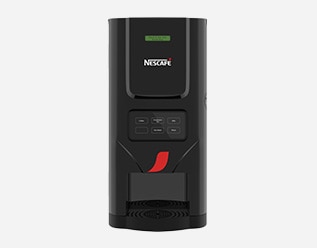
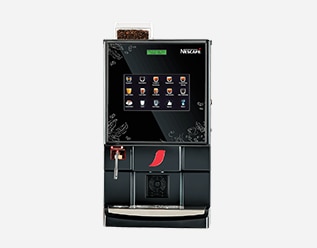
Please choose from the Machine below


Machine User Guide
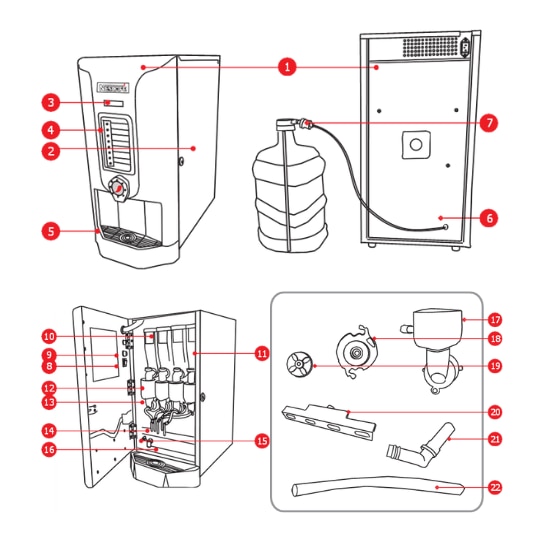
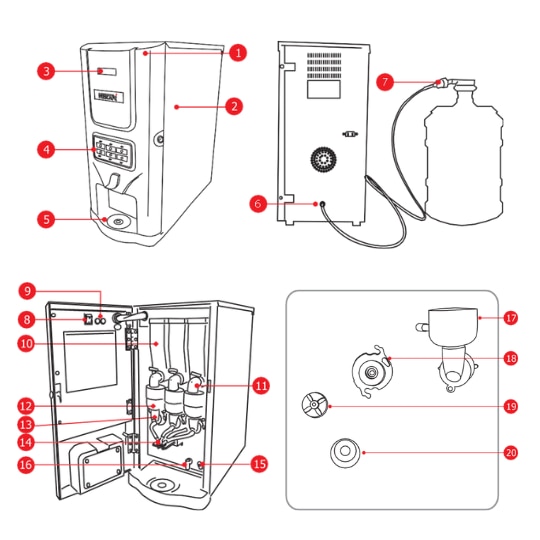
1. Front and back panels
2. Side panel
3. Display
4. Selection panel/buttons
5. Drip tray
6. Water Inlet
7. Water Filter
8. Power Switch
9. Fuse 5Amp/15Amp
10. Canister
11. Product guide
12. Mixing chamber
13. Whipper assembly
14. Dispensing Nozzle
15. Boiler Drain
16. Boiler Overflow pipe
17. Mixing bowl
18. Whipper base
19. Impeller
20. Steam trapper
21. Dispensing nozzle
22. Dispensing tube
| S.No | Loading In Machine | Steps |
|---|---|---|
| 1 | Loading Products in Machine |
1. Open the front door. 2. Remove the product guide 3. Replace the cap 4. Remove the canister. 5. Before opening agitate the canister to force all remaining powder down the delivery screw. 6. Fill the selected canister with powder until about 1cm from the top. 7. Close canister with lid. 8. Shake gently to equalize. 9. Clean the canister from the outside with tissue paper. 10. Put the canister back in the correct place (ensure correct connection with the powder motor). 11. Open the cap. 12. Put the product guide in the machine. 13. Close the front door. |
| S.No | Cleaning Procedure | Steps |
|---|---|---|
| 1 | Loading Products in Machine |
1. Switch off the machine 2. Carefully lift the canister & pull towards yourself. 3. Rotate the product guide up & remove the canister. 4. Remove the canister from the machine after putting cap. 5. Remove mixing bowl. 6. Remove dispensing nozzle & silicon pipe. 7. Remove whipping chamber, impeller & whipper base. 8. Pre clean all the parts with water, then drain water. 9. Take potable warm water in a small plastic tray & take 5-6 drops of detergent. 10. Clean them using brush until visually clean, then drain solution. 11. Twice rinse the plastic parts with hot water. After every rinse drain water. 12. Dry the whipping chamber impeller, clean tissue and reassemble. 13. Reassemble the dispensing tube & dispensing nozzle. 14. Fix the mixing chamber on the whipper base. 15. Place the canister back after cleaning from outside by tissue paper. 16. Remove cap & place the product guide back on the canister. 17. Remove the drip tray & clean it thoroughly with detergent & reassemble. 18. Wipe exterior of the machine with tissue paper & switch on the machine. |
| S.No | Alerts | Diagnostics | Remedial Action |
|---|---|---|---|
| 1 | Machine not switching on | Machine not plugged properly | 1. Plug the machine properly and check the main switch |
| 2 | No beverage dispensing from the machine. | Display showing Please wait less hot | Check the set temperature |
| 3 | No product delivery from the machine |
1. No product in canister 2. Check fitment canister |
1. Refill the product in the canister 2. Properly fit the canister |
| 4 | Please check water level on LCD | 1. Water bottle empty |
1. Switch off the machine and replace the bottle. 2. Switch off the machine. |
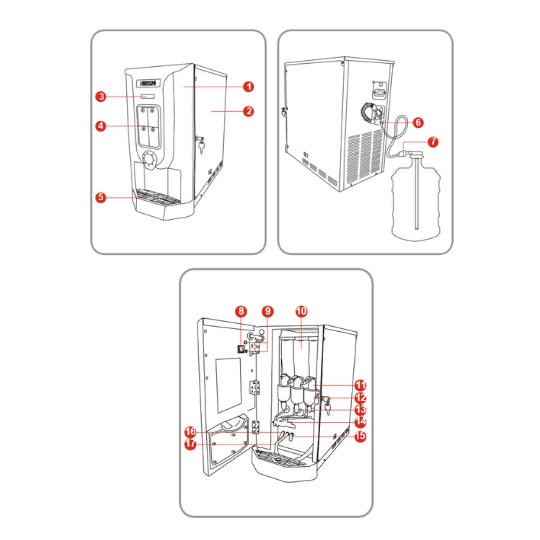
1. Door
2. Side panel
3. Display
4. Selection panel/buttons
5. Drip tray
6. Water Inlet
7. Non-Return Valve
8. Power Switch
9. Fuse 5Amp
10. Canister
11. Product guide
12. Mixing chamber
13. Whipper assembly
14. Dispensing Nozzle
15. Overflow Pipe
16. Boiler Drain
17. Chiller Drain
a) Open the front door
b) Remove the product guide
c) Replace the cap.
d) Remove the canister.
e) Before opening shake the canister to force all remaining powder down the delivery screw.
f) Fill the canister with powder leaving about 1cm from the top
g) Close canister with lid.
h) shake gently to equalize
i) Clean the canister from outside with tissue paper.
j) Put the canister back in the correct place (ensure correct connection with the powder motor).
k) Open the cap.
l) Put the product guide in the machine.
m) Rotate the product guide in clockwise direction
n) Close the front door
| S.No | Cleaning Procedure | Steps |
|---|---|---|
| 1 | Disassembly of parts |
1. Switch off the machine 2. Rotate the product guide up & remove the canister. 3. Put the cap on the canister. 4. Carefully lift the canister & pull towards yourself. 5. Remove mixing bowl. 6. Remove sillicon pipe 7. Remove the dispensing nozzles. 8. Remove whipping chamber impeller & whipper base. 9. Pre clean all the parts with water. Then drain the water. 10. Take 2 liter of water in a small plastic tray & add 20 ml of Suma Bac Solution. 11. Submerge all the parts in the solutions for 15 minutes & cleaning them with brush until visually clean. Then drain the 12. Rinse all the parts with hot water & drain it. Wipe all the parts with tissue paper to dry. |
| 2 | Assembly of parts |
1. Reassemble whipper assembly 2. Reassemble the dispensing nozzles 3. Reassemble the dispensing tube 4. Fix the mixing chamber on the whipper base 5. Place the canister back after cleaning from outside by tissue paper. 6. Remove the cap & place the product guide back on the canister & rotate into clockwise direction. 7. Open the door & remove the drip tray & clean it throughly with detergent & reassemble. 8. Wipe exterior of the machine with tissue paper & switch on the machine 9. Press the button No 4 for 4-5 seconds, Machine will go into heating mode. 10. After 5-7 Minutes, Machine will show "Please Rinse". Now Press Button No. 4 for rinse |
| S.No | Problems Observed | Problem Cause | Remedial Action |
|---|---|---|---|
| 1 | Machine not switching on | Machine not plugged properly | 1. Plug the machine properly and check the main switch |
| 2 | No beverage dispensing from the machine | Display showing please wait less cold | Check the set temperature |
| 3 | No product delivery from the machine |
1. No product in canister 2. Check fitment canister |
1.Refill the product in the canister 2. Properly fit the canister |
| 4 | Please check water level on LCD | 1. Water Bottle empty |
1. Switch off the machine 2. Replace the bottle 3. Switch on the machine |
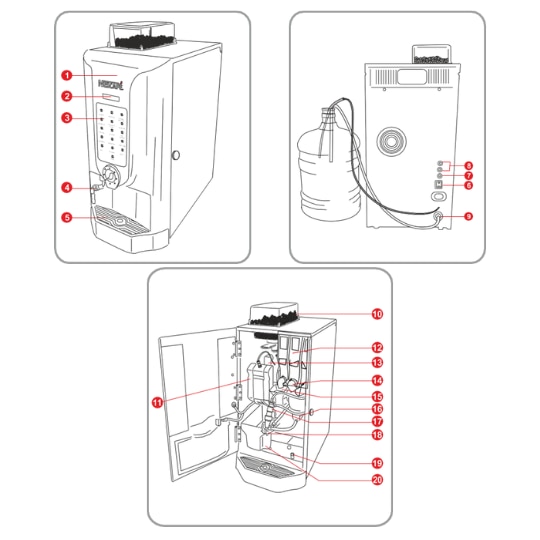
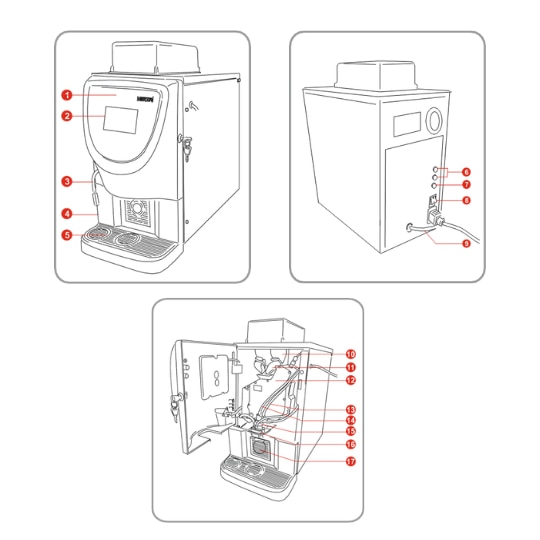
1. Door
2. Display
3. Beverage Selection Menu
4. Steam Wand
5. Drip Tray
6. Power Switch
7. Fuse 5 Amp.
8. Fuse 10 Amp.
9. Water Inlet
10. Bean Hopper
11. Brewer
12. Canister
13. Bean guide
14. Product guide
15. Mixing Chamber
16. Whipper Assembly
17. Cappuccinator
18. Dispensing Nozzle
19. Over flow pipe
20. Bean waste collection tray
| S.No | Question | Answer |
|---|---|---|
| 1 | Loading products in the machine canisters |
1. Open the front door. 2. Remove the product guide from the canister. 3. Carefully lift the canister & pull towards yourself. 4. Before opening shake the canister to force all remaining powder down the delivery screw. 5. Fill the canister with powder leaving about 1 cm from the top. 6. Close canister with lid. 7. Shake gently to equalize. 8. Clean the canister from outside with tissue paper |
| 2 | Loading liquid milk in the refrigerator. |
1. Open the front door. 2. Remove the product guide from the canister. 3. Carefully lift the canister & pull towards yourself. 4. Before opening shake the canister to force all remaining powder down the delivery screw. 5. Fill the canister with powder leaving about 1 cm from the top. 6. Close canister with lid. 7. Shake gently to equalize. 8. Clean the canister from outside with tissue paper |
| 3 | Loading whole roasted beans in the machine canisters |
1. Push the slider inside the close beans outlet. 2. Cut the bean packet with clean scissor. 3. Remove the bean hopper lid & take out splitter from the bean hopper. 4. Transfer the bean into the bean hopper. 5. Insert the splitter in the bean hopper and replace the lid. 6. Pull the slider towards yourself to open beans outlet. |
| S.No | Malfunctions | Root Cause | Remedial Solutions |
|---|---|---|---|
| 1 | Machine Not "Switching On" Initially | Machine Not Plugged Properly. | Plug the machine properly and check the main switch |
| 2 | No Beverage dispense from the machine. Display Indicating - Heating. | Boiler and steamer have not achieved the set temperature. | Wait for the boiler and steamer to achieve set temperature. |
| 3 | No product delivery from the machine. |
1. No product in the canister/Bean Hopper 2. Check Fitment Canister 3. Bean Slider in closed position |
1. Refill the product in the canister/Bean Hopper. 2. Properly fit the canister. 3. Pull the slider towards yourself. |
| 4 | No milk delivery from the machine. |
1. No Milk in the container. 2. Silicon tube not properly immerse in the milk. 3. Cappuccinator pipe fitting interchanged. |
1. Pour the Milk in the container. 2. Immersed the silicon tube properly in the milk. 3. Ensure cappuccinator pipe fitting. |
| 5 | Display showing "Sorry No Water!!! |
1. Water Bottle Empty 2. Loose pump connection |
1. Switch off the machine and replace the bottle. 2. Switch off the machine, check pump connection at the back panel of the machine |
| 6 | Display Showing "Brewer Error EO9" | 1. Brewer not clean | Switch off the machine take out the brewer from the machine. Again properly fit the brewer in the machine |
| 7 | Display Showing "Brewer Error E10" | Bewer not fitted properly | Switch off the machine take out the brewer from the machine. Again properly fit the brewer in the machine |
| 8 | Display Showing "Flow meter Error" | Water bottle empty | Switch off the machine and replace the bottle |
| S.No | Daily Cleaning Procedure | Steps |
|---|---|---|
| 1 | Cleaning of Machine Section |
1. Switch off the machine 2. Remove the product guide from canister. 3. Carefully lift the canister & pull towards yourself. 4. Remove the Cappuccinatore 5. Disassemble the parts of Cappuccinatore 6. Remove the mixing bowls 7. Remove the dispensing nozzles 8. Remove whipper chamber, Impeller & whipper base. 9. Remove the bean guide from grinder 10. Remove the steam wand part by rotating in the clockwise direction. 11. Pre-clean all the parts with water, Then drain water 12. Take one of the pouch (4gm) of Sumsool sanitizer & dissolve in 4l of water. 13. Take 21 of prepared sanitizer in the tray & Submerge all the parts in the solution for 15 minutes. Clean them with brush until visual dean. Drain the solution after 15 minutes 14. Rinse all the parts with hot water & drain it. Wipe all the parts with tissue paper to dry 15. Reassemble steam wand part by rotating in the anti clockwise direction 16. Reassemble the bean guide in grinder 17. Reassemble whipper assembly 18. Reassemble the dispensing nozzles 19. Fix the mixing chamber on the whipper base 20. Reassemble the parts of Cappuccinatore with silicon tube in the machine 21. Connect the Cappuccinatore 22. Place the canister back after cleaning from outside by the tissue paper. 23. Reassemble the product guide in the canister, |
| 2 | Cleaning of Refrigerator |
1. Remove the milk tank from Refrigerator 2. Drain the left over milk 3. Throughly clean with water 4. Take 200 ml of sanitizer solution prepared earlier 5. After cleaning with Sanitizer thoroughly dean with water |
1. Door
2. Side panel
3. Display
4. Selection panel/buttons
5. Drip tray
6. Water Inlet
7. Non Return Valve
8. Power Switch
9. Fuse 5Amp/10Amp
10. Canister
11. Product guide
12. Mixing chamber
13. Whipper assembly
14. Dispensing Nozzle
15. Boiler Drain
16. Boiler Overflow pipe
17. Mixing Bowl
18. Whipper Base
19. Impeller
20. Sealent
| S.No | Loading In Machine | Steps |
|---|---|---|
| 1 | Loading Products in Machine |
1. Open the front door. 2. Remove the product guide 3. Replace the cap 4. Remove the canister. 5. Before opening agitate the canister to force all remaining powder down the delivery screw. 6. Fill the selected canister with powder until about 1cm from the top. 7. Close canister with lid. 8. Shake gently to equalize. 9. Clean the canister from the outside with tissue paper. 10. Put the canister back in the correct place (ensure correct connection with the powder motor). 11. Open the cap. 12. Put the product guide in the machine. 13. Rotate the product guide in clockwise direction 14. Close the front door. |
| S.No | Cleaning Procedure | Steps |
|---|---|---|
| 1 | Cleaning of Machine Section |
1. Switch off the machine 2. Rotate the product guide up & remove the canister. 3. Put the cap on the canister. 4. Carefully lift the canister & pull towards yourself. 5. Remove mixing bowl. 6. Remove silicon pipe 7. Remove dispensing nozzle by rotating. 8. Remove whipping chamber, impeller & whipper base. 9. Pre clean all the parts with water, then drain water. 10. Take potable warm water in a small plastic tray & take 5-6 drops of detergent. (food grade) 11. Clean them using brush until visually clean, then drain solution. 12. Twice rinse the plastic parts with hot water. After every rinse drain water. 13. Dry the whipping chamber impeller, clean tissue and reassemble. 14. Reassemble the dispensing tube & dispensing nozzle. 15. Reassemble the dispensing tube. 16. Fix the mixing chamber on the whipper base. 17. Place the canister back after cleaning from outside by tissue paper. 18. Remove cap & place the product guide back on the canister & rotate into clockwise direction. 19. Open the door & remove the drip tray & clean it thoroughly with detergent & reassemble 20. Wipe exterior of the machine with tissue paper & switch on the machine. |
| S.No | Alerts | Diagnostics | Remedial Action |
|---|---|---|---|
| 1 | Machine not switching on |
Machine not plugged properly Faulty Fuse |
Plug the machine properly and check the main switch Check the 5 AMP fuse and change if required. |
| 2 | Display shows refilling for too long | No Water in the bottle/supply line | Check water in the water bottle/supply line. |
| 3 | No product delivery from the machine | Canister |
1. Check the level in the canister. Refill if required. 2. Check canister with the ingredient motor. |
| 4 | Please check water level on LCD | 1. Water bottle empty |
1. Switch off the machine and replace the bottle. 2. Switch off the machine. |
1. Door
2. Touch Screen
3. Steam Wand
4. Backdrop
5. Drip Tray
6. Fuse 10 Amp.
7. Fuse 5 Amp.
8. Power Switch
9. Water Inlet
10. Canister
11. Product guide
12. Brewer
13. Air Inlet tube
14. Steam Inlet tube
15. Cappuccinatore
16. Dispensing nozzle holder
17. Cup Stand
| S.No | Loading In Machine | Steps |
|---|---|---|
| 1 | Loading Products in Machine |
1. Open the front door. 2. Remove the product guide from the canister & put cap on the canister outlet. 3. Carefully lift the canister & pull towards yourself. 4. Before opening share the canister to force all remaining powder down the delivery screw. 5. Fill the canister with powder leaving about 1 cm from the top 6. Close canister with lid. 7. Shake gently to equalize. 8. Clean the canister from outside with tissue paper. 9. Place the canister back in the machine. Open the cap & insert the powder guide on the canister outlet. |
| 2 | Loading Liquid Milk in Refrigerator |
1. Open the front door. 2. Lift the silicon tube up. 3. Take out the milk container & open the lid. 4. Open the UHT milk pack the way it is show on the pack. 5. Pour the milk in the container. Put the Lid back on the container. 6. Put it back in the refrigerator & pull back the silicon tube to immerse in the milk. 7. Please ensure refrigerator temperature should always is below 8-degree Celsius |
| S.No | Cleaning Procedure | Steps |
|---|---|---|
| 1 | Cleaning of Machine Section |
1. Switch off the machine 2. Remove the product guide from the canister & insert cap on the canister outlet. 3. Carefully lift the canister & pull towards yourself. 4. Remove the cappuccinatore. 5. Disassemble the parts of the cappuccinatore as shown in picture. 6. Remove the silicon tube & dispensing nozzle holder. 7. Pre-clean all the parts with water. Then drain water. 8. Take 20 ml of suma bac D10 & 2 Ltr. Of water. 9. Take 1 L of prepared sanitizer in the tray & submerge all the parts in the solution for 15 minutes. 10. Rinse all the parts with hot water & drain it. Wipe all the parts with tissue paper to dry. 11. Reassemble the silicone tube & dispensing nozzle holder. 12. Reassemble the parts of cappuccinatore as shown in picture. 13. Connect the cappuccinatore with silicon tube in the machine as shown. 14. Place the canister back after cleaning from outside by the tissue paper. 15. Reassemble the product guide in the canister. |
| 2 | Cleaning of Refrigerator |
1. Remove the milk from the refrigerator. 2. Drain the left-over milk. 3. Thoroughly clean with water. 4. Take 200 ml of sanitizer solution prepared earlier. 5. After cleaning with sanitizer thoroughly clean with water. 6. Switch on the machine & refrigerator. 7. Switch on the machine & refrigerator. 8. Press setting icon interface of screen. 9. Press the operator icon on the interface of screen. 10. Press sanitize icon on the interface of screen. 11. Please place empty container and press continue 12. Place solution in container & press continue. 13. Please wait sanitization in process 14. Please place water in container & press continue. 15. Touch the rinse icon on interface 16. After automatically rinse cycle take out the water container. 17. Clean the refrigerator with dry cloth 18. Add milk in the container & replace in the refrigerator. 19. Remove the drip tray & clean it thoroughly & reassemble. 20. Machine is ready for dispensing. |
| S.No | Problems Observed | Problem Cause | Remedial Action |
|---|---|---|---|
| 1 | Machine not switching on | Machine not plugged properly |
1. Plug the machine properly and check the main switch |
| 2 | No beverage dispensing from the machine, Display indication - Heating | Thermoblock have not achieved the set temperature | Wait for thermoblock to achieve set temperature |
| 3 | No product delivery from the machine |
1. No product in canister 2. Check fitment canister |
1.Refill the product in the canister 2. Properly fit the canister |
| 4 | No Milk delivery from machine |
1. No Milk in the milk container 2. Silicon tube not properly immerse in the milk 3. Cappuccinator pipe fitting interchanged. |
1. Pour the milk in the container 2. Immersed the silicon tube properly in the milk 3. Please ensure cappuccinator pipe fitting. |
| 5 | Display Showing sorry no water |
1. Water bottle empty 2. Loose pump connection |
1. Switch off the machine and replace the bottle. 2. Switch off the machine, check pump connection at the back panel of the machine. |